So, You Wanna Get Those Epic LA Shots, Huh?
Alright, listen up, because if you’re heading to Los Angeles with a camera – or just your phone – you’re in for a treat. LA isn’t just a city; it’s a giant, sun-drenched photo studio waiting for you. Honestly, I’ve probably spent more time trying to find the perfect angle in this town than I have actually sleeping. After years of snapping everything from desolate desert roads to the most bustling cityscapes – and trust me, I’ve got a whole hard drive dedicated just to LA – I’ve learned a thing or two about where to go, when to go, and how to snag those scroll-stopping shots. Forget those basic Google searches; this is the real talk, from someone who’s actually sweated it out for the ‘gram.
The Hollywood Sign: Iconic, But Tricky to Frame
Okay, let’s kick things off with the big one, literally: The Hollywood Sign. Everyone wants it, right? But here’s the deal: you can’t just waltz up to it. It’s on a guarded hill, and trust me, those security guards don’t play.
My Take on Getting the Shot:
- The Best Viewing Spot (My Pick!): Forget Runyon Canyon if you want a *good* shot of the sign itself. It’s too far and usually packed. Instead, head to Griffith Observatory. The views from there are just killer, especially at sunset. You get the sign, the city skyline, and often, some pretty dramatic clouds.
- For a Closer, More ‘Hike-y’ Vibe: My personal favorite, after trying pretty much all the trails, is the Hollyridge Trail. Park near 3400 Canyon Lake Dr. It’s residential, so be respectful and quiet. The hike itself is maybe 3 miles round trip, a bit dusty, but you get seriously close to the sign, almost behind it! Just don’t hop the fence, okay? The fines are insane. I saw one guy get a $500 ticket there last year. Ouch.
- What I Learned the Hard Way: Don’t try to park directly at the Griffith Observatory entrance on a weekend afternoon. I wasted like 45 minutes circling, ended up parking a mile down the hill and hiking up. Not ideal when you’re lugging camera gear. So, plan for either early morning (before 9 AM) or late afternoon (after 5 PM) to beat the main rush, or just prepare for a trek. Parking at Griffith is usually $10/hour, which, you know, adds up fast.
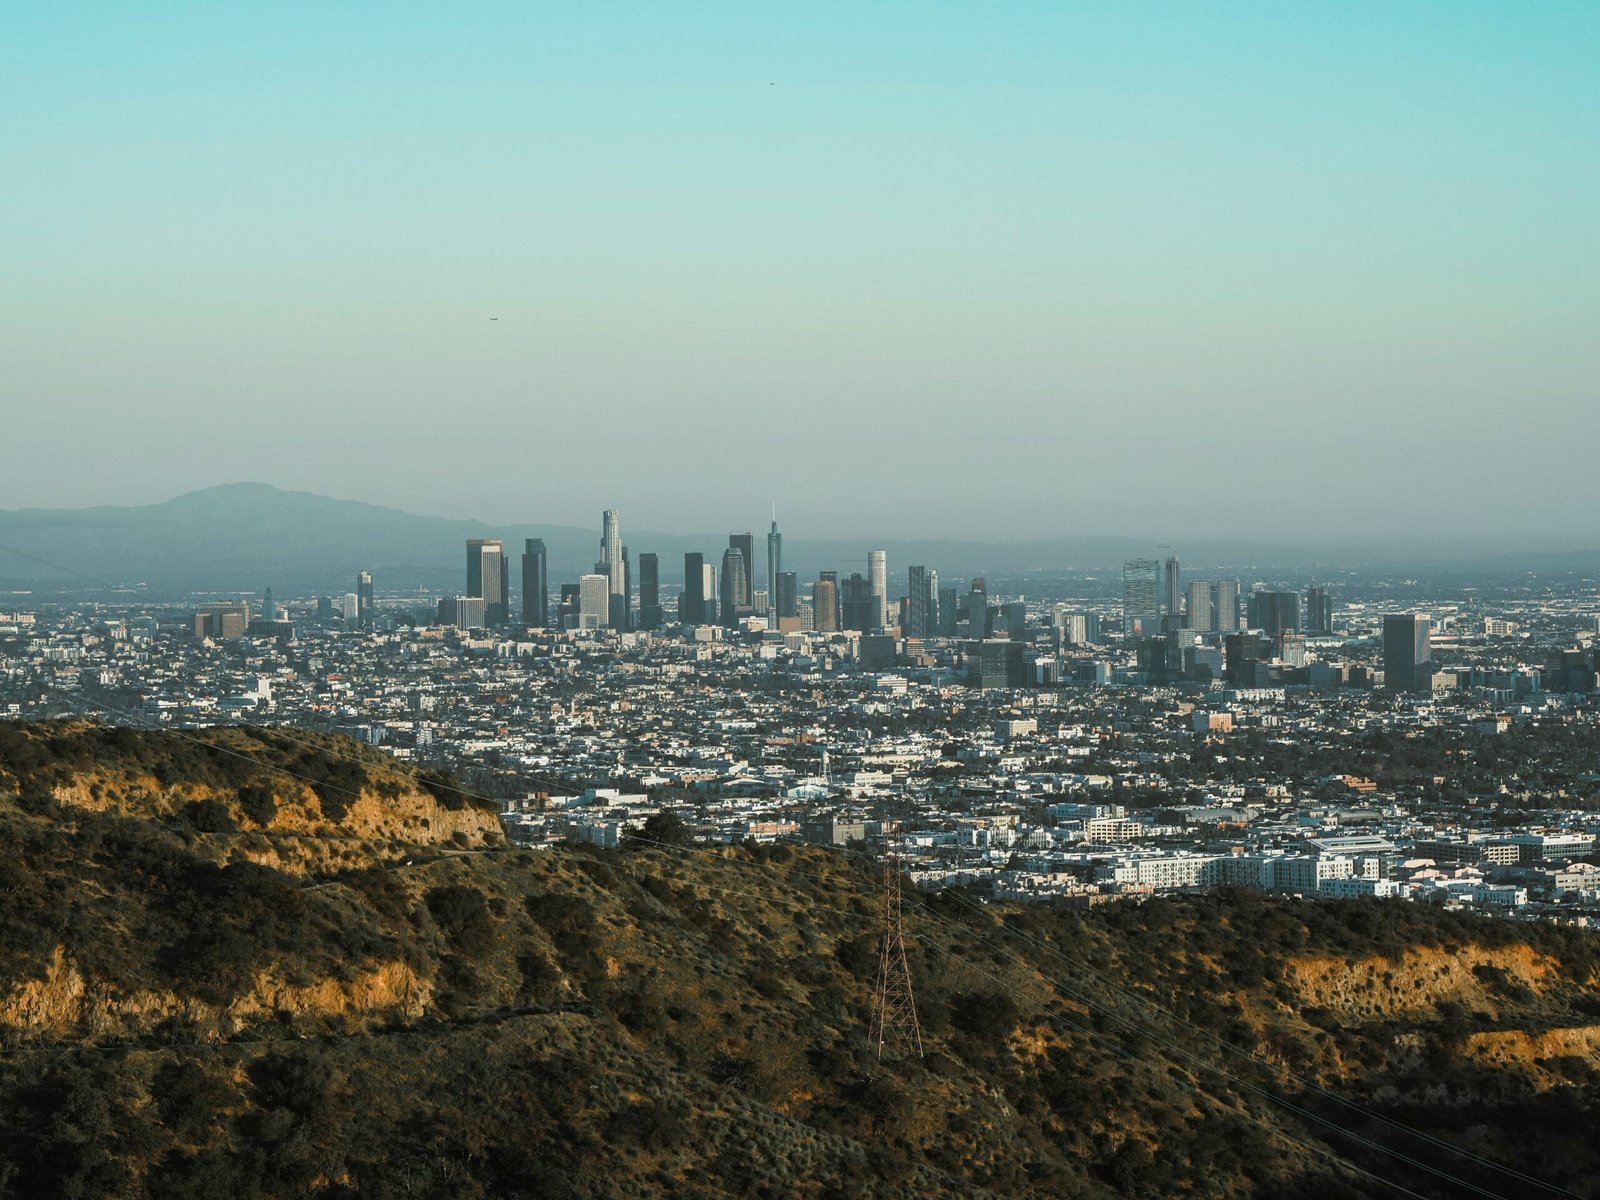
Griffith Observatory: Views That Stop Time (and Your Feed)
Speaking of Griffith Observatory, this place isn’t just for looking at the Hollywood Sign. It’s a destination in itself. You get a panoramic view of downtown LA, the Pacific Ocean, and the Hollywood Sign all at once. It’s pretty magical, especially at golden hour.
Insider Tips for Your Visit:
- The “Magic Hour”: If you want truly epic shots, aim for an hour before sunset. The light is just ridiculously soft and warm. Everything glows. You can get some incredible silhouettes of the city too. My very first time there, I went mid-day, and while it was cool, the light was harsh, and the photos just didn’t pop the way they do at sunset. Huge difference.
- Inside Scoop: Go inside! It’s free, and the architecture is stunning. The main rotunda with the Foucault pendulum makes for some really cool, wide-angle interior shots. Plus, the telescopes on the roof are open to the public in the evenings; seeing Jupiter’s moons through a historic telescope? Pretty wild.
- Avoiding the Crowds: Saturday evenings are a zoo. Like, seriously. If you can swing a weekday morning right when they open (12 PM Weds-Fri, 10 AM Sat-Sun), you’ll have a much more relaxed experience. Or, try coming up on a cloudy day; fewer people, and the moody light can actually make for some dramatic, unique photos.
Santa Monica Pier & Beach: Classic California Vibes
You can’t really do LA without a trip to the beach, and the Santa Monica Pier is pretty much quintessential California. Ferris wheel, roller coaster, street performers, and that endless Pacific Ocean. So, yeah, it’s a big one for photos.
My Thoughts on Snapping Santa Monica:
- Perspective is Key: Don’t just shoot *on* the pier. Get down on the beach, north or south of the pier, and shoot *back* towards it, especially at sunset. The silhouette of the Ferris wheel against a fiery sky? Pure gold. I once spent an hour trying to get a perfect long exposure of the waves crashing under the pier, and it was totally worth the sandy feet.
- Foodie Photo Op: Grab a churro or some cotton candy from one of the vendors right there on the pier. That pop of color against the ocean backdrop? Instant ‘gram hit. But be warned, those churros are like $8 a pop now. Wild, right?
- The Catch: It’s busy. All the time. Especially on weekends. You will have people in your shots unless you’re super patient or get there at dawn. Parking can also be a headache, but there are multiple paid lots right along Pacific Coast Highway or the adjacent streets. Expect to pay $15-$25 for a few hours. I once got suckered into an $18 lot for just 90 minutes. Never again.
Downtown LA Arts District Murals: A Canvas Around Every Corner
If you’re into street art and vibrant colors, the DTLA Arts District is your playground. Every block, every alley, sometimes even the side of a coffee shop, has an incredible mural. It’s a rotating gallery, really. A few years ago, I spent a whole afternoon just wandering, camera in hand, and swear I found a new piece of art every five minutes. It’s way more raw and real than some of the more polished spots.
Hunting for Street Art Gold:
- Where to Start: I usually just park somewhere around 3rd and Traction Ave and just start walking. Don’t be afraid to poke your head down side streets. Some of the coolest pieces are hidden away. The area around Bestia (a fantastic, but pricey, Italian restaurant) has some constantly changing stuff.
- Be Ready for Anything: Murals change. A lot. Something I photographed six months ago might be painted over with something new now. That’s part of the charm, but also means if you see something you love, snap it then!
- Photo Tip: Look for murals that reflect off puddles after a rain shower. It adds an amazing dimension. Also, try to get a shot with a classic LA palm tree popping up behind some street art. It screams LA without being too cliché.
- Safety & Parking: The Arts District is generally safe during the day, but always be aware of your surroundings, especially if you’re alone. Parking is mostly street parking (meters) or small paid lots, usually $5-$10 for a couple of hours.
LACMA Urban Light: That Iconic Lamp Post Shot
You know the one. Rows and rows of antique street lamps. LACMA’s Urban Light installation by Chris Burden. It’s become one of *the* go-to spots in LA, and for good reason. It’s just gorgeous, especially as day turns to night.
My Experience & Advice for Urban Light:
- The Best Time (Hands Down): Dusk. Absolutely dusk. That moment when the lamps first flicker on, and there’s still a hint of blue in the sky? Pure magic. But it gets crowded fast. Like, seriously fast. If you want a shot without a dozen other people in it, you need to arrive maybe 20-30 minutes *before* sunset and be patient.
- Creative Angles: Don’t just stand at one end and shoot down. Walk among the lamps, shoot from inside the rows looking out, or even get low to the ground. The play of light and shadow is what makes this spot so special. Try a shot looking up through the lamps with the museum building in the background.
- It’s Free: Good news! The Urban Light exhibit is on the street level, accessible to everyone, 24/7. So no entry fee for this particular photo op. Parking is under the museum, or you might find street parking further down Wilshire Blvd, but those are usually metered. Museum parking is usually $18 flat rate.
Beverly Hills: Rodeo Drive & The Pink Wall
Okay, if you’re looking for a bit of glam and some serious architectural aesthetics, Beverly Hills delivers. From the fancy boutiques of Rodeo Drive to the famous Pink Wall, it’s a whole different vibe.
Getting Your Glam Shots:
- Rodeo Drive: Yes, it’s super high-end, but it’s also just beautiful to walk. The architecture is stunning. Look for the Beverly Wilshire Hotel (that’s the Pretty Woman hotel, FYI). Or just grab a coffee at Alfred Coffee on Melrose and then cruise around. My pro tip? Don’t try to actually buy anything unless you’ve just won the lottery. Just enjoy the window shopping and the incredible cars.
- The Pink Wall: This is a classic for a reason. It’s located at Paul Smith on Melrose Avenue (8221 Melrose Ave). It’s literally just a bright pink wall, but it’s perfect for bright, fun, minimalist photos.
- Pink Wall Wisdom: The light is best either early morning or late afternoon. Mid-day sun can be harsh and cast weird shadows on you. Try to catch it when the wall is evenly lit. Parking on Melrose can be tough, mostly metered street parking, but there are some small lots around the corner.
Venice Canals & Boardwalk: Two Sides of the Same Coin
Just a hop, skip, and a jump from Santa Monica, you’ve got Venice. But here’s the thing: Venice is really two very different experiences. You have the quirky, often chaotic Venice Beach Boardwalk, and then the surprisingly serene Venice Canals. Both are super Instagrammable, but for totally different reasons.
Capturing Venice’s Dual Personality:
- The Canals: Tucked away just a few blocks from the beach (enter around Dell Ave and S Venice Blvd), these are a truly hidden gem. Beautiful bridges, charming houses, sometimes even a duck or two paddling by. It’s quiet, peaceful, and totally unexpected in LA. I’ve walked these canals maybe a dozen times, and it never gets old. It feels like stepping into a European village.
- The Boardwalk: This is where you go for people-watching. Street performers, skateboarders, Muscle Beach, souvenir shops. It’s a sensory overload in the best way. For photos, focus on the characters, the vibrant art, or the sunset over the ocean. It’s gritty, real, and full of life.
- A Word of Warning: The boardwalk can get a bit wild, especially on weekends. Just keep an eye on your belongings. And some of the characters might not appreciate being photographed without asking. Use your judgment. Parking for both is usually in paid lots near the beach, often $10-$20.
Practical Stuff: Don’t Make My Mistakes!
- Timing is Everything: Seriously. For almost every outdoor spot in LA, ‘golden hour’ (the hour after sunrise or before sunset) is your best friend. Less harsh shadows, beautiful soft light, and often fewer crowds if you hit sunrise. I wasted $200 on an expensive tripod and lenses before I realized that *when* I shot was more important than *what* I shot with.
- Parking is a Beast: LA parking is notorious. Always factor in time to find it, and money to pay for it. Read signs carefully; tow-away zones are no joke, and neither are the fines.
- Traffic is Your Enemy: This city moves slowly. A 10-mile drive can easily take an hour. Group your photo spots geographically to save your sanity.
- Wear Comfy Shoes: You’ll be doing a lot of walking, even if you’re driving between locations.
FAQs I Get All the Time:
“Hey, what’s the one spot I absolutely CANNOT miss if I only have a day?”
Oh man, that’s tough! But if I had to pick just *one* for maximum impact, it’d be Griffith Observatory at sunset. You get the Hollywood Sign, the city lights, and truly epic views. It’s pretty much a triple threat for your feed, and it’s an experience beyond just the photo.
“Is LA safe for solo photographers, especially with expensive gear?”
Most of the big tourist spots are totally fine during the day. Just use common sense, you know? Don’t leave your gear unattended, stay aware of your surroundings, and maybe don’t flash your most expensive camera in a deserted alley at night. The Arts District, for example, is great during the day but I wouldn’t recommend wandering alone after dark with a big camera bag. Trust your gut!
“Do I need a fancy camera, or is my phone good enough?”
Honestly? Your phone is probably more than good enough for most of these spots these days. Seriously, phone cameras have gotten so good. The best camera is the one you have with you, right? Focus on light, composition, and editing. That said, if you have a wide-angle lens for your phone, that can really help capture the scale of some of these places. But no, you don’t *need* a DSLR to get killer LA shots. I mean, my Instagram feed is probably 60% phone shots these days, and I’m a total gear head.
So there you have it, folks. My top picks and all the real talk you need to absolutely crush your LA photography adventure. Get out there, explore, and don’t forget to look up sometimes, okay? The light in this city is just something else. Happy snapping!